
Behind the Chair
How to Blend a Fade Without Chasing the Same Line
Learn how to blend a fade with deliberate guard changes, controlled strokes, and practical checks that help you refine lines while preserving the shape.
October 17, 2026

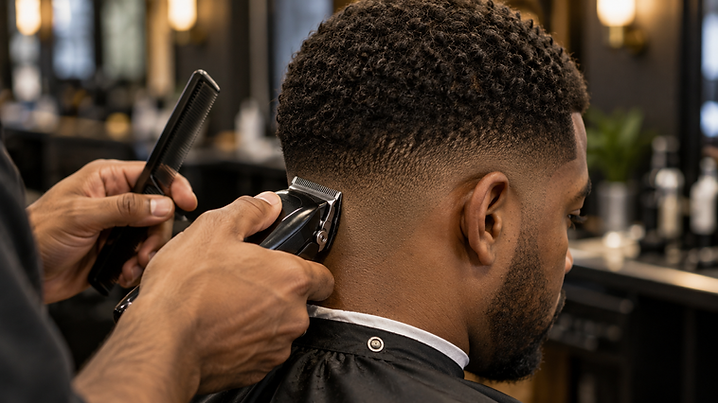
The line above the ear is still there.
You brush the hair down, open the lever, and go back over it. It looks better for a moment. Then you check the mirror and notice the dark band has moved higher. Now the low fade you planned is creeping toward the temple.
That is where a small correction can turn into a different haircut.
Learning how to blend a fade means learning to recognize what needs cutting—and when to stop. Before you make another pass, figure out what you are looking at.
Start with the shape the client actually wants
“Low fade” is a useful starting point, but it does not tell you everything. Ask the client to show you where they want the shortest area to sit, how much darkness they want to keep on the sides, and whether they want skin showing.
Then examine the head in front of you. Growth patterns, changes in density, and the shape around the back of the head can affect the result. BCcampus’s barbering education text treats head shape and growth patterns as essential parts of the consultation.
Agree on the silhouette before you start refining the blend. When a line becomes frustrating, that agreed shape gives you something to protect.
Give yourself room to build the transition
A fade needs a progression between its shortest and longest sections. Crowding those changes into a space you cannot comfortably control makes the detail work harder.
There is no single measurement that works for every fade. A compressed blend and a stretched blend have different looks. The client’s hair and the intended finish should guide your choice.
For practice, use a mannequin to compare the two. Keep the starting and finishing lengths similar, but change the space between them. Photograph the results. You will have a clearer sense of what your section placement is doing.
Before removing a line, describe it
“I can still see something” is too vague to guide your next move.
Try to identify the exact problem:
- A narrow, continuous line between two lengths.
- A broader patch of weight above the blend.
- A dark area that changes when you comb the hair in another direction.
- A light patch that makes the surrounding hair appear heavier.
These observations should lead to different decisions. Treating every dark area as a guard line encourages unnecessary cutting.
Brush away loose clippings. Comb the hair into position. Check it from another angle. If you cannot explain what you intend to remove, pause before putting the clipper back on the head.
Make guard and lever changes deliberately
A guard sequence is easier to follow when you understand what each setting leaves behind.
Wahl’s fading tutorial uses changes in attachment combs and lever position to connect lengths. The useful lesson is the relationship between those settings: each change has a purpose in a particular part of the transition.
On a conventional adjustable clipper, opening the lever generally leaves more length; closing it cuts closer. Check the specifications for your own equipment. Guard labels and adjustment ranges are not a universal language across every clipper system.
When refining a guarded transition, begin conservatively with a setting appropriate to that area. Make a small test pass, clear the clippings, and inspect the result. Adjust only when you can see that the remaining hair requires it.
Changing the guard, lever position, stroke, and pressure together makes it difficult to know what helped. Keep your corrections deliberate enough that you can learn from them.
Control how the blade leaves the head
Pay attention to the end of the stroke.
Driving straight up through the transition can remove hair you intended to preserve. A controlled outward movement lets you leave the head as you approach the longer section. Andis describes this as a rocking-out motion or C-stroke in its progressive fading guide.
Practice that exit slowly. Think about where the blade should stop cutting, rather than simply how high your hand should travel.
Broad strokes belong to broader work. As the remaining problem gets smaller, your working area should get smaller too. Avoid repeatedly sweeping through a whole panel to correct one short section.
Read the growth direction around the ear and nape
An upward pass does not meet every hair in the same way.
Around the ear and neckline, growth may change direction within a small area. Andis distinguishes cutting with the grain from cutting across it and discusses directional cutting in transitional areas.
Comb through the section and observe how the hair returns. Where appropriate, adjust your approach to meet the remaining hairs more effectively, using a conservative length first.
Do not combine a shorter setting with a new direction without considering the extra removal that may result. Test, inspect, and work within the shape you planned.
Check the connection into the top
Sometimes the fade itself is developing well, but the weight above it makes the finish look disconnected.
Look at the area where the sides round into the top. Does that weight belong to the style? Or does it create an unwanted ledge?
Sam Villa’s fade education demonstrates preserving length near this curve, then refining the connection with comb-and-shear work. The point is to choose a technique that suits the shape you want to keep.
If the issue is the upper connection, repeatedly taking a short guard higher may sacrifice the sides before resolving the actual problem. Assess the longer section directly.
A reset for the moment you feel stuck
When you catch yourself working the same spot without a clear improvement, put the clipper down briefly.
Use this reset:
- Clear the loose hair.
- Comb the section into its intended position.
- Check the side and back in the mirror.
- Name the remaining problem.
- Choose one small correction and inspect it before repeating.
For example, suppose a dark band remains behind the ear. Before switching to a shorter guard, check whether it continues around the head. Comb it in another direction. Look at the weight immediately above it.
That short assessment may reveal a local problem requiring a local correction. It also gives you a chance to notice when more cutting would damage the shape.
Know when the fade is finished
A close-up inspection has its place. So does seeing the haircut at a normal viewing distance.
Check both sides, the back, and the connection into the top. Let the client sit naturally. Look at the whole silhouette before returning to one tiny area.
Ask yourself: Does the transition look intentional? Have you kept the height the client wanted? Is another pass likely to improve the haircut?
That last question matters. You cannot put removed hair back, and a small variation does not automatically justify another round of cutting.
The next time a line refuses to disappear, pause long enough to understand it. A well-chosen correction gives you more control than another dozen uncertain passes.
Put your finished work where potential clients can see it. Explore BarberScope and share the cuts that show your approach behind the chair.